Friday, August 26, 2016

GNOME Keysign - GSoC 2016 Final Report


Modernising GNOME-Keysign


As GSoC 2016 came to end,  here's what happened to this project over the summer. I have created a separate 'gsoc' branch with details about the implementation [1]. There's also a readme file that shows a more detailed list with the tasks.

To summarize my work for this summer, here's what I've did:

  • I've re-created the GUI using Glade and Gtk Builder. This improves the user experience and makes the codebase more robust.
  • I've improved the app logic by adding states and transition phases that will give users more feedback about what happened. 
  • I've ported most of the functionality from the old app to the new one. The 'key download' and 'key sign' functionalities are still missing, but I'm hoping to have them added by the end of this week. 
  • Packaging the app. I've done this using the python setuptools module. It should take care of most of the dependencies, the problem is that some of them are not in the 'cheese shop' (like avahi and pygobject). 
  • Package the old app using flatpak. 


What will happen after GSoC


We want modularity between the widgets to be able to run each of them individually. Now that the GUI is constructed with Gtk.Builder, we can split the classes better, to follow a loose coupling design.

With the help of my mentor Tobias Mueller and flatpak people, we managed to have a flatpak bundle which anyone can install without caring too much of the dependencies [2]. After downloading the bundle , you can do `flatpak --user install --bundle` on that file and it will install it.

You can also copy the manifest file and the makefiles from here [3], and build the app them using:

flatpak-builder --force-clean -v --repo=/tmp/fb.repo /tmp/fpbuilder org.gnome.Keysign.json
flatpak remote-add --user gks /tmp/fb.repo
flatpak install --verbose --user gks org.gnome.Keysign

For me it remains to package the new app using flatpak, after I'm done adding the rest of the functionality.

This was GSoC 2016!  I was grateful to have a chance to work again on this project, and I hope people will be more interested about it. It's a nice tool to have when you're at some open source conference, after or before the conference you can exchange your OpenPGP keys with others in an easy and secure way.

Thanks for reading.

[1] https://github.com/andreimacavei/gnome-keysign-glade-ui/tree/gsoc
[2] http://muelli.cryptobitch.de/tmp//2016-08-19-GNOME-Keysign.flatpak
[3] https://github.com/andreimacavei/gnome-keysign-flatpak

Monday, July 25, 2016

GNOME Keysign - Report #2 GSoC 2016

More than a week ago I blogged about the new GUI made with GtkBuilder and Glade [1].  Now, I will talk about what has changed since then with the GUI and also the new functionality that has been added to it.

I will start with the new "transition" page which I've added for the key download phase. Before going more in depth, I have to say that the app knows at each moment in what state it is, which really helps in adding more functionality.

The transition page will give user more feedback about the download status of a key, because in the old gnome-keysign GUI, when the download was interrupted the GUI didn't show anything. Now, the GUI is more explicit about the process:


If the download fails, the spinner widget stops and an error message is shown. If the download is successful, the app will auto-advance to the confirmation page and the user is presented with details for the key he's about to sign:


A few people noticed that I am displaying short key ids in the GUI. I want to say that the entire key fingerprint is used when authenticating a downloaded key. The other info shown in the GUI are just key details that I'm getting from GnuPG and I'm displaying in the interface.
Though, I will stop displaying the 8 chars ID , because user may be influenced somehow by this.

Other changes that have been done since the last post were:

  • added a "Confirm" button to sign a key
  • added a transition phase for the key signing also
  • implement the "Refresh" keylist button
  • minor GUI adjustments
  • use logging instead of print
  • improve code quality

Apart from these, one major change is the GPG functionality added to the new GUI. The gpgmh.py file made by Tobias acts as a common interface for what gpg libraries we'll use in the future. For now, you can test the new GUI with your own keys on the gpgmh branch [2]. This requires having the 'monkeysign' package installed [3].

In the following week I'm adding the widgets for the QR code and the QR scanner, as well as making a simple script that will create a flatpack app.


[1] http://andreimacavei.blogspot.ro/2016/07/gnome-keysign-new-gui-and-updates.html
[2] https://github.com/andreimacavei/gnome-keysign-glade-ui/commits/gpgmh
[3] http://monkeysphere.info/monkeysign/

Friday, July 15, 2016

GNOME Keysign new GUI and updates

As of now we have a new and better GUI for GnomeKeysign app which I've made using Glade3 and Gtk.Builder. The new user interface looks more sharp and integrates better with other gnome apps.

Here's are some windows comparison between the old GUI and the new one. The new GUI can be found on my github repo [1].

  • The app window for presenting User's own PGP keys

          Old:

           New:


  • The window for presenting the fingerprint and QR code of the key


  • The window for scanning a QR code or type a key fingerprint


Thanks to Allan Day for the mock-ups which I've followed when creating the new GUI [2].

Some widgets aren't yet integrated, such as the QR code generator or the integrated webcam, but the base functionality of the GUI is working and the code for it looks more clean.

I've discovered that using Gtk.Builder and Glade is a better approach than coding the GUI manually, as I've done in the past GSoC. Also, the builder object gives a more robust way of separating the user interface from the application logic.

The future work is to finish connecting the remaining functionality with the new GUI, and afterwards make it use Flatpak [3].


[1] https://github.com/andreimacavei/gnome-keysign-glade-ui/tree/master
[2] https://github.com/gnome-design-team/gnome-mockups/blob/master/keysigning/keysigning.png
[3] http://flatpak.org/developer.html

Friday, July 24, 2015

GSoC 2015 Report #3 - New GPG library for Python is ready!

Hi people,

GnomeKeysign now has a new library that can call GnuPG from Python.

This was a key point in making GnomeKeysign to be 'Gnome ready' because our previous gpg library made the project less distributable and it also used GTK2.

The library is using pygpgme to interact with gnupg and aside from what pygpgme does, it also offers some important functionality for us like

  • set up temporary context objects (like keyrings) which don't mess with user's gnupg home
  • import keys from Unicode data that we receive over network
  • sign only a specific UID of a key in order to email back the key signed to that UID
  • sign and encrypt keydata that is going to be sent as email attachment back to the key owner
  • helper functions which allows to export keydata, to extract fingerprint of a key, to format a key such that it will be displayed in the GUI

Of course it will take a few weeks to refine this library, but I'm very optimistic that in the end people could use it if they ever want to work with GnuPG from Python.

I had to overcome some limitations in pygpgme but I'm glad that I managed to do this.

I'm happy to come to GUADEC again this year, after I was the first time in 2014
Thanks GNOME for sponsoring me!


Wednesday, June 24, 2015

GSoC 2015 Report #2 - Internationalization support for GnomeKeysign

Because the replacement of the GPG wrapper is taking longer than I have expected, I have done something that will surely make GnomeKeysign one step closer to become GNOME ready - I have added support for Internationalization and Localization.

I had no knowledge about this so I started reading this tutorial which is more customized for C projects that use autotools.
GnomeKeysign is a Python pure project and it uses distutils/setuptools for building and installing.

I will explain step by step how to add support for translations in a Python application but first I will talk a little about building & packaging in Python.

"Real artists ship. Or so says Steve Jobs." (taken from www.diveintopython3.net)

It seemed reasonable that Python should have a packaging framework , hence distutils.
Distutils is many things: a build tool (for you), an installation tool (for your users), a package metadata format (for search engines), and more. It integrates with the Python Package Index  (“PyPI”), a central repository for open source Python libraries.

A good project layout could be the following

top
| -- package
|    | -- __init__.py
|    | -- module.py
|    `-- subpackage
|         | -- __init__.py
|         | -- submodule.py
| -- runner
| -- MANIFEST.in
| -- README
| -- [setup.cfg]
| -- setup.py

If you want to know more about what every file does then check the Python Packaging User Guide .
Already having a good project structure , I could easily add support for internationalization (i18n).

To  add i18n support we need to accomplish these tasks:
  1. Configure the function that translates the strings
  2. Mark the strings in the code with that function
  3. Generate a template for the translators (the .pot file)
  4. Add translations
  5. Include the translations in the installation

Configure the '_()' macro

The Python gettext module allows you to mark strings in source code, extract those strings for translation, and use the translated strings in your application. It is a common practice to define macros which are shorter wrappers, like the '_()'  macro that replaces a gettext() call

import gettext
t = gettext.translation("gnome-keysign", PATH_TO_MO_FILES)
_ = t.ugettext


Mark strings for i18n

Search the source code files for strings that are visible in the GUI (window title, labels, button labels, messages, and so on) and wrap them inside '_()' function

print _("Getting ready for i18n.")


Generate template for translators

Using a command line tool, you generate a ".pot" file from the source code. This file contains all strings that need translation in the project. We only need to generate it  once or after the strings change in the code. The file is generated inside /po folder and the command used is
xgettext --language=Python --keyword=_ --output=po/gnome-keysign.pot `find . -name "*.py"`


Add translations

Then, from the ".pot" file , using another command line tool we will generate the ".po" files for each language. These are the files that translators need to complete. Inside the po/ folder we use this command
msginit --input=PROJECTNAME.pot --locale=LOCALE

But once the program is running, it doesn't use .po files directly, but a binary (compiled) version of them: the .mo files. These .mo files must be re-created on build time (when creating the package) and installed in the right location in the system.


Include translations into the project installation

The setup.py file is where various aspects of the project are configured. Alongside with the general setup arguments there is a `cmdclass` argument where we put the code to perform custom actions such as code generation, running tests, building translation files, etc.

I implemented a custom command derived from distutils.cmd.Command which will generate the '.mo' files in build time and in install time will include the '.mo' files into the data_files list. In this way we include the translations by overloading the default 'build' and 'install' instructions.

Now I can translate GnomeKeysign and run it in my language :-).

That's all for now, I will be posting again after I'm done with the GPG replacement part.


~Andrei


Saturday, June 20, 2015

Google Summer of Code 2015 - GnomeKeysign

Hi there,

This is the first post about my project with GNOME for GSoC 2015. I have just finished my exams and now I will be more active.

Last summer I have started from an idea: make OpenPGP keys exchange & sign easier through an app.  This is how GnomeKeysign [0] appeared.

It allows people to connect over a local network , choose from one of their personal keys to be signed by others, transfer the public key from one peer to other , sign it and send it as an email attachment back to its owner.

The app has also a minimalistic GUI and it supports web cam integration to allow for scanning a QR-encoded fingerprint of the key.

Now my job is to make this app ready for integration with GNOME. For this I am following the next points, but not necessarily in this order:


  • Remove dependencies - at the moment we use a custom build gpg wrapper to call out GnuPG and a qrencode library that is a wrapper of a C library.  We want to replace those with libraries written entirely in python (pygpgme, PyQRCode) to make distribution easier.
  • Add internationalization support - even though this isn't isn't as urgent as other points, it will offer me a good perspective on project development & deploying for GNOME.
  • Give GnomeKeysign better looks - the current GUI is designed by me (with suggests from my mentor). It requires a more professional GUI and adhere to Gnome design patterns.
  • Establish a secure channel - at this moment we only authenticate the data received, so the application only process data after it is authenticated. A secure channel would help deter attacks such as keyserver-in-the-middle.
  • Build a test harness - these tests will cover GnuPG communication, key signing, GUI testing.

This was just an introduction post. I have done some work [1] on the gpg wrapper replacement and I will blog about it soon.

See you soon,
Andrei


Thursday, August 21, 2014

GSoC Final Report - Use GNOME Keysign to sign OpenPGP keys

I haven't blogged about my work progress lately but I had implemented most of the features that were planned when GSoC started.

Short description of the project
My project was to make a tool that will help people in the the OpenPGP Keysigning[1] process.
Geysign will take care of all the steps a user must take to get his key signed or sign another one's key  by automating the process while following the OpenPGP best practices.


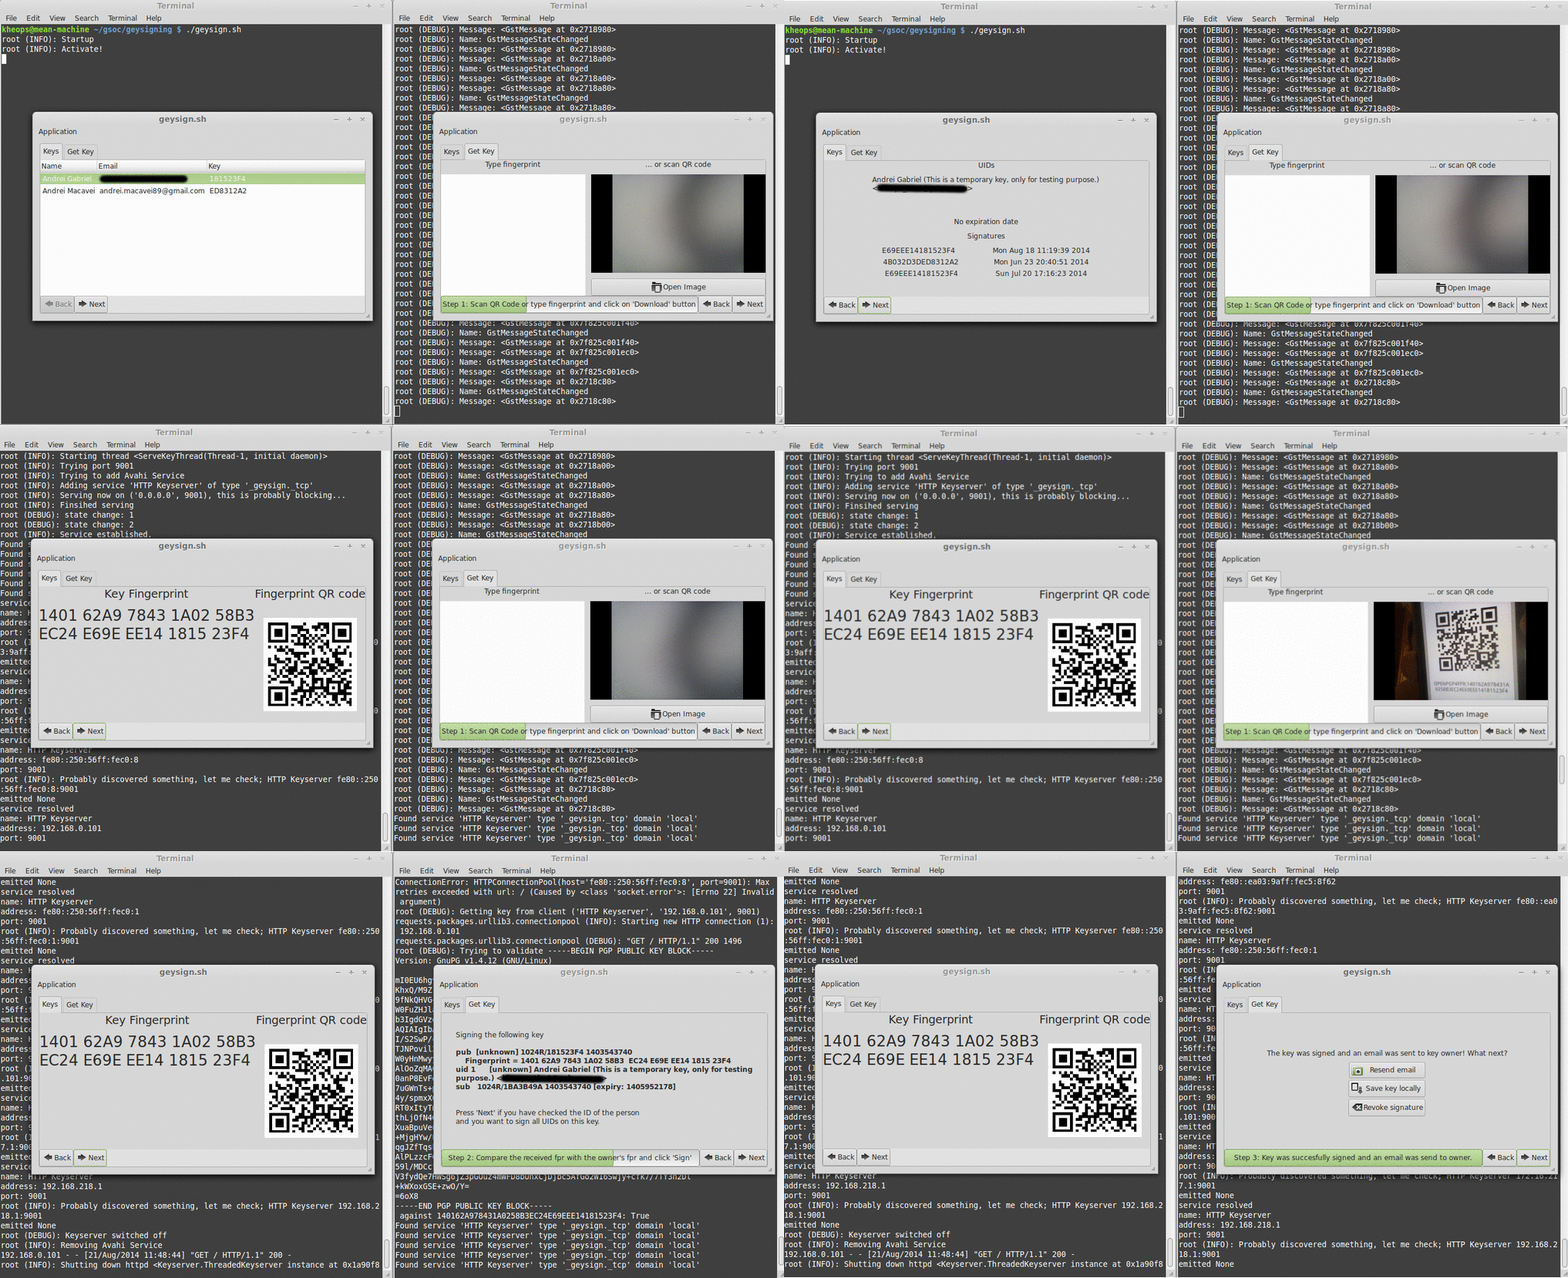
What Geysign currently does:

  • Displays your personal keys from which you can choose one at a time and get it signed.
  • Encode's the selected key's fingerprint into a barcode that can be scanned. The fingerprint can also be typed if your device has no video camera available.
  • Uses avahi to publishes itself on the network and to discover other Geysign services. This allows a "plug and play"  or straightforward process (otherwiser user would have to get the ip address and port)
  • When requested, starts a local http server that will listen for new connections to download the public key data.
  • Authenticates the received key data by checking if the scanned/typed fingerprint is the same with the one from the key (which was previously imported into a temporary keyring).
  • If the two fingerprint match, then it will proceed to sign the key and export it
  • Email the key back to its owner (not yet implemented).

The last point will be done after GSoC as well as giving the app a new GUI. Until now I had cared more about the functionality of the app and less about how it looks. 

Here is a short demo that shows the process of signing a key by using two Geysign applications on the same machine (unfortunately I didn't had a working network with two computers).
You can check the code on git repository [2]. I am glad to see people are interested in this as I already received a pull request from someone who wants to contribute to Geysign.


With this occasion I want to thank GNOME for sponsoring the accommodation to GUADEC, I enjoyed being there for the first time.

I also want to mention my mentor Tobias Mueller and thank him for the help he gave me, I learnt a lot from him. 
My work on Geysign will continue and I hope that in the future it will be integrated into Seahorse.

[1] Open PGP Web of Trust : https://wiki.openstack.org/wiki/OpenPGP_Web_of_Trust
[2] Git repo: https://github.com/andreimacavei/geysigning