Friday, July 24, 2015

GSoC 2015 Report #3 - New GPG library for Python is ready!

Hi people,

GnomeKeysign now has a new library that can call GnuPG from Python.

This was a key point in making GnomeKeysign to be 'Gnome ready' because our previous gpg library made the project less distributable and it also used GTK2.

The library is using pygpgme to interact with gnupg and aside from what pygpgme does, it also offers some important functionality for us like

  • set up temporary context objects (like keyrings) which don't mess with user's gnupg home
  • import keys from Unicode data that we receive over network
  • sign only a specific UID of a key in order to email back the key signed to that UID
  • sign and encrypt keydata that is going to be sent as email attachment back to the key owner
  • helper functions which allows to export keydata, to extract fingerprint of a key, to format a key such that it will be displayed in the GUI

Of course it will take a few weeks to refine this library, but I'm very optimistic that in the end people could use it if they ever want to work with GnuPG from Python.

I had to overcome some limitations in pygpgme but I'm glad that I managed to do this.

I'm happy to come to GUADEC again this year, after I was the first time in 2014
Thanks GNOME for sponsoring me!


Wednesday, June 24, 2015

GSoC 2015 Report #2 - Internationalization support for GnomeKeysign

Because the replacement of the GPG wrapper is taking longer than I have expected, I have done something that will surely make GnomeKeysign one step closer to become GNOME ready - I have added support for Internationalization and Localization.

I had no knowledge about this so I started reading this tutorial which is more customized for C projects that use autotools.
GnomeKeysign is a Python pure project and it uses distutils/setuptools for building and installing.

I will explain step by step how to add support for translations in a Python application but first I will talk a little about building & packaging in Python.

"Real artists ship. Or so says Steve Jobs." (taken from www.diveintopython3.net)

It seemed reasonable that Python should have a packaging framework , hence distutils.
Distutils is many things: a build tool (for you), an installation tool (for your users), a package metadata format (for search engines), and more. It integrates with the Python Package Index  (“PyPI”), a central repository for open source Python libraries.

A good project layout could be the following

top
| -- package
|    | -- __init__.py
|    | -- module.py
|    `-- subpackage
|         | -- __init__.py
|         | -- submodule.py
| -- runner
| -- MANIFEST.in
| -- README
| -- [setup.cfg]
| -- setup.py

If you want to know more about what every file does then check the Python Packaging User Guide .
Already having a good project structure , I could easily add support for internationalization (i18n).

To  add i18n support we need to accomplish these tasks:
  1. Configure the function that translates the strings
  2. Mark the strings in the code with that function
  3. Generate a template for the translators (the .pot file)
  4. Add translations
  5. Include the translations in the installation

Configure the '_()' macro

The Python gettext module allows you to mark strings in source code, extract those strings for translation, and use the translated strings in your application. It is a common practice to define macros which are shorter wrappers, like the '_()'  macro that replaces a gettext() call

import gettext
t = gettext.translation("gnome-keysign", PATH_TO_MO_FILES)
_ = t.ugettext


Mark strings for i18n

Search the source code files for strings that are visible in the GUI (window title, labels, button labels, messages, and so on) and wrap them inside '_()' function

print _("Getting ready for i18n.")


Generate template for translators

Using a command line tool, you generate a ".pot" file from the source code. This file contains all strings that need translation in the project. We only need to generate it  once or after the strings change in the code. The file is generated inside /po folder and the command used is
xgettext --language=Python --keyword=_ --output=po/gnome-keysign.pot `find . -name "*.py"`


Add translations

Then, from the ".pot" file , using another command line tool we will generate the ".po" files for each language. These are the files that translators need to complete. Inside the po/ folder we use this command
msginit --input=PROJECTNAME.pot --locale=LOCALE

But once the program is running, it doesn't use .po files directly, but a binary (compiled) version of them: the .mo files. These .mo files must be re-created on build time (when creating the package) and installed in the right location in the system.


Include translations into the project installation

The setup.py file is where various aspects of the project are configured. Alongside with the general setup arguments there is a `cmdclass` argument where we put the code to perform custom actions such as code generation, running tests, building translation files, etc.

I implemented a custom command derived from distutils.cmd.Command which will generate the '.mo' files in build time and in install time will include the '.mo' files into the data_files list. In this way we include the translations by overloading the default 'build' and 'install' instructions.

Now I can translate GnomeKeysign and run it in my language :-).

That's all for now, I will be posting again after I'm done with the GPG replacement part.


~Andrei


Saturday, June 20, 2015

Google Summer of Code 2015 - GnomeKeysign

Hi there,

This is the first post about my project with GNOME for GSoC 2015. I have just finished my exams and now I will be more active.

Last summer I have started from an idea: make OpenPGP keys exchange & sign easier through an app.  This is how GnomeKeysign [0] appeared.

It allows people to connect over a local network , choose from one of their personal keys to be signed by others, transfer the public key from one peer to other , sign it and send it as an email attachment back to its owner.

The app has also a minimalistic GUI and it supports web cam integration to allow for scanning a QR-encoded fingerprint of the key.

Now my job is to make this app ready for integration with GNOME. For this I am following the next points, but not necessarily in this order:


  • Remove dependencies - at the moment we use a custom build gpg wrapper to call out GnuPG and a qrencode library that is a wrapper of a C library.  We want to replace those with libraries written entirely in python (pygpgme, PyQRCode) to make distribution easier.
  • Add internationalization support - even though this isn't isn't as urgent as other points, it will offer me a good perspective on project development & deploying for GNOME.
  • Give GnomeKeysign better looks - the current GUI is designed by me (with suggests from my mentor). It requires a more professional GUI and adhere to Gnome design patterns.
  • Establish a secure channel - at this moment we only authenticate the data received, so the application only process data after it is authenticated. A secure channel would help deter attacks such as keyserver-in-the-middle.
  • Build a test harness - these tests will cover GnuPG communication, key signing, GUI testing.

This was just an introduction post. I have done some work [1] on the gpg wrapper replacement and I will blog about it soon.

See you soon,
Andrei


Thursday, August 21, 2014

GSoC Final Report - Use GNOME Keysign to sign OpenPGP keys

I haven't blogged about my work progress lately but I had implemented most of the features that were planned when GSoC started.

Short description of the project
My project was to make a tool that will help people in the the OpenPGP Keysigning[1] process.
Geysign will take care of all the steps a user must take to get his key signed or sign another one's key  by automating the process while following the OpenPGP best practices.


What Geysign currently does:

  • Displays your personal keys from which you can choose one at a time and get it signed.
  • Encode's the selected key's fingerprint into a barcode that can be scanned. The fingerprint can also be typed if your device has no video camera available.
  • Uses avahi to publishes itself on the network and to discover other Geysign services. This allows a "plug and play"  or straightforward process (otherwiser user would have to get the ip address and port)
  • When requested, starts a local http server that will listen for new connections to download the public key data.
  • Authenticates the received key data by checking if the scanned/typed fingerprint is the same with the one from the key (which was previously imported into a temporary keyring).
  • If the two fingerprint match, then it will proceed to sign the key and export it
  • Email the key back to its owner (not yet implemented).

The last point will be done after GSoC as well as giving the app a new GUI. Until now I had cared more about the functionality of the app and less about how it looks. 

Here is a short demo that shows the process of signing a key by using two Geysign applications on the same machine (unfortunately I didn't had a working network with two computers).
You can check the code on git repository [2]. I am glad to see people are interested in this as I already received a pull request from someone who wants to contribute to Geysign.


With this occasion I want to thank GNOME for sponsoring the accommodation to GUADEC, I enjoyed being there for the first time.

I also want to mention my mentor Tobias Mueller and thank him for the help he gave me, I learnt a lot from him. 
My work on Geysign will continue and I hope that in the future it will be integrated into Seahorse.

[1] Open PGP Web of Trust : https://wiki.openstack.org/wiki/OpenPGP_Web_of_Trust
[2] Git repo: https://github.com/andreimacavei/geysigning

Friday, July 11, 2014

GSoC Report #2 - Avahi network service discover (GNOME Keysign)

Hi !

Last time I had talked about the design of the GUI for Keysign application and how will this app be used to automate key signing process. I ended up with telling you that I had started to work on the network part of the application and that I used avahi to discover services on the network.

Basically, in order to transfer data between two computers we have to implement a client-server model:

  •  The client is the Keysign app found on the computer of the person who will sign a key. This will make a request on the ip address and port discovered by avahi.
  •  The server is the Keysign app that is found on the person's laptop who wants to get his key signed. When that user selects a key and present it to be signed, it will start up the server that listens for tcp connection.

Now here comes the avahi ' s job, which is to allows us to publish and discover services and hosts running on the local network.
This simple scenario involves only two users connected on the same WIFI network. Later on it might be best to open a secured channel and have all key signing participans connected to it.
Right now, after we 'll establish a connection, the public key can be transferred insecurely but authenticated by using the owner's key fingerprint.

Here is a simplistic example of an event-driven Avahi Publisher using avahi and dbus libraries for python:


  1. class AvahiPublisher:
  2.     def __init__(self, name, port, stype="_demo._tcp",
  3.                  domain="", host="", text=""):
  4.         # simple instantiation
  5.     def publish(self):
  6.         bus = dbus.SystemBus()
  7.         server = dbus.Interface(bus.get_object(
  8.                                     avahi.DBUS_NAME,
  9.                                     avahi.DBUS_PATH_SERVER),
  10.                                 avahi.DBUS_INTERFACE_SERVER)
  11.         group = dbus.Interface(
  12.                     bus.get_object(avahi.DBUS_NAME,
  13.                                    server.EntryGroupNew()),
  14.                     avahi.DBUS_INTERFACE_ENTRY_GROUP)

  15.         group.AddService(avahi.IF_UNSPEC, 
  16.                      avahi.PROTO_UNSPEC,dbus.UInt32(0),
  17.                      self.name, self.stype, self.domain, self.host,
  18.                      dbus.UInt16(self.port), self.text)
  19.         group.Commit()
  20.         self.group = group
  21.     def unpublish(self):
  22.         self.group.Reset()


For this to work you need the avahi D-Bus API that uses avahi-daemon and has bindings for other languages than C.

The problem that I had encountered was with the avahi service browsing. D-Bus connections require a main loop to  make asynchronous calls, receive signals or export objects so that whenever a new service is published or unpublished, avahi discovers it and calls the handler method.

The thing is that the default main loop of the Gtk+ application doesn't work with DBus. It seems that DBus is expecting a DBusGMainLoop , not an ordinary loop.
Not only this but the library wraps dbus-glib rather then gio's dbus implementation which we wanted to use.

For now we will stick with these rather old bindings if we want to use avahi. As a temporary solution , we use both GObject Introspection and python-dbus. It is bad but I lack the knowledge for how to make it work in other way.

This is how the service discovering is handled:


  1. class AvahiBrowser(GObject.GObject):
  2.     __gsignals__ = {
  3.         'new_service'(GObject.SIGNAL_RUN_LAST, None,
  4.             # name, address (could be an int too (for IPv4)), port
  5.             (str, str, int))
  6.     }
  7.     def __init__(self, loop=None, service='_._tcp'):
  8.         GObject.GObject.__init__(self)
  9.         self.service = service
  10.         # It seems that these are different loops..?!
  11.         self.loop = loop or DBusGMainLoop()
  12.         self.bus = dbus.SystemBus(mainloop=self.loop)
  13.         self.server = dbus.Interface( self.bus.get_object(
  14.                avahi.DBUS_NAME, '/')'org.freedesktop.Avahi.Server')
  15.         self.sbrowser = dbus.Interface(self.bus.get_object(
  16.             avahi.DBUS_NAME,self.server.ServiceBrowserNew(avahi.IF_UNSPEC,
  17.                 avahi.PROTO_UNSPEC, TYPE, 'local', dbus.UInt32(0))),
  18.             avahi.DBUS_INTERFACE_SERVICE_BROWSER)
  19.         self.sbrowser.connect_to_signal("ItemNew", self.on_new_item)

  20.     def on_new_item(self, interface, protocol, name, stype, 
  21.                    domain, flags):
  22.         print "Found service '%s' type '%s' domain '%s' " 
  23.                % (name, stype, domain)
  24.         self.server.ResolveService(interface, protocol, name, stype,
  25.             domain, avahi.PROTO_UNSPEC, dbus.UInt32(0),
  26.             reply_handler=self.on_service_resolved,
  27.             error_handler=self.on_error)


I want to thank my mentor Tobi for helping me on this part, as there were some things a bit too complex for me.
In any case, the app now publishes itself on the network and browse for services until it is stopped. It is not handled properly yet , as to only publish the service only when a key is available to be transferred, but work is in progress.

From now on I will post more frequently as I have done some work but did not post about it yet.
I hope you enjoyed reading this. See you soon :-)


Tuesday, June 17, 2014

GSoC Report #1 - Have a look at the GUI of Geysigning (GNOME keysigning)


Hello !

I should start by saying that my academic exam period has finally ended and now I can focus on the project which I'm doing for GNOME.

The very basic idea of this project is to help people who attend Key signing Parties and automate the long process it takes to sign each other's key. Afterwards this project can be further extended and integrated with GNOME desktop platform to offer users an easier way to encrypt information and  exchange keys over a local network.

To achieve this we have to start with a simple and minimalist Graphical User Interface (GUI). I am using GTK+ 3 for Python which I found easy to understand and develop applications in it. There is a good tutorial that is continuously updated. Here is the link to it if you want to check it out.

For now this does all that we want which is to develop fast from scratch a program that should work in the following scenario: one person wants to sign another person's key while both of them are physically close (and on the same WiFi network). It must be simple enough to use while also dealing with keys, signatures, revocations, sending emails, authenticating data, etc.
Later when we will want to scale it to work with more users we will probably ditch python and migrate to a very fast language like C.

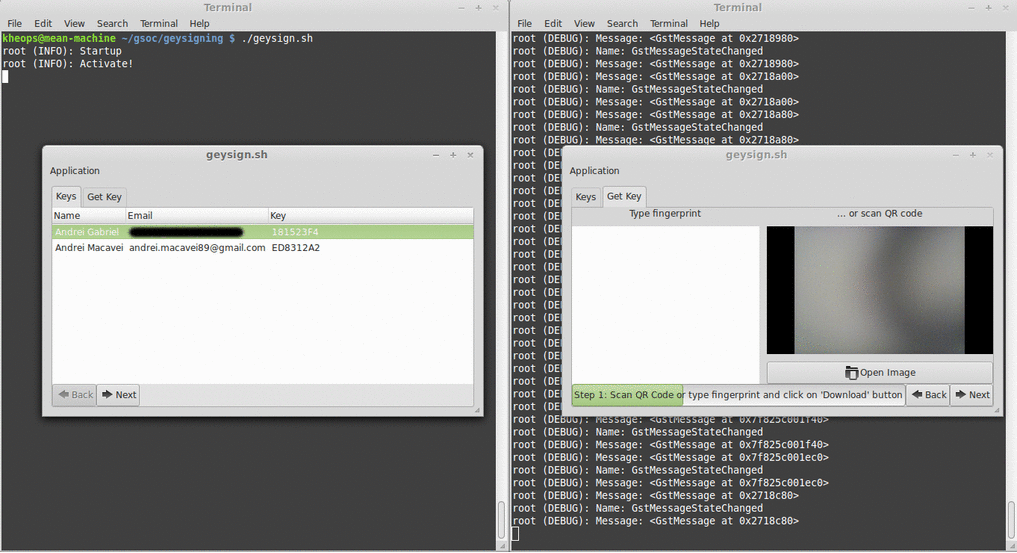
OK then, let's start with how the GUI looks until this moment. I have chose to use a gtk+3 notebook container so I can make use of the possibility to add pages to it:

Image 1 - "Keys" page (tab)


Here you can see the main notebook container with two pages: "Keys" and "Get Key". The first one will populate a list of keys from the user's list of keys, and the second which is shown below, will give the possibility to enter or scan a key fingerprint encoded as a QR code:

Image 2 - "Get Key" page (tab)


I've constructed this UI by creating a separate class for each page and then put them together into a MainWindow class. The "KeySignSection()" and "GetKeySection()" are objects of specialised classes for "Keys" and "Get Key" pages:


  1. class MainWindow(Gtk.Window):
  2.     def __init__(self):
  3.         Gtk.Window.__init__(self, title="Geysigning")
  4.         self.set_border_width(10)
  5.         # create notebook container
  6.         notebook = Gtk.Notebook()
  7.         notebook.append_page(KeySignSection(), Gtk.Label('Keys'))
  8.         notebook.append_page(GetKeySection(), Gtk.Label('Get Key'))
  9.         self.add(notebook)
  10.         # setup signals
  11.         self.connect("delete-event", Gtk.main_quit)


The progress bar shown in Image 1 will be filled with each step a user takes to sign a key. Each of these steps represents a page in another notebook container, a child widget of the "Keys" page.

This notebook container have its tab labels hidden. For example after a user selects a key and presses the "Next" button down right , the notebook should change to the second step of the process which shows information about the selected key :

Image 3 -  "Fingerprint" & "QR" sub-page 2


As you can see, the progress bar doesn't change accordingly to the current step of the process. I haven't found a way to fix this but I'm still learning GTK+ :).

For now, me and my mentor Tobias Mueller decided to stop working on the UI and moved on the network part of Geysigning app.
In order to communicate over the network between two or more instances of the same application, the latter must first advertise its existence on the network. It also must discover other services of the same type,  on the network. This means that a computer network must be created and thus it requires implementing the zero-configuration networking.

I have done this using avahi but I will tell you the details in the next post. Until then, I hope you had a good time reading this. See you soon :-)


Sunday, May 18, 2014

Google Summer of Code 2014

Hello,

Good news, I have been accepted to Google Summer of Code 2014 , a program dedicated to students that helps them to get involved into open source world.

This is my first GSoC project and I am happy to be part of such a great community like GNOME.

The project that I'll be working on it's called Geysign. This will provide GNOME platform with a tool which will integrate into desktop and will ease up the process of signing Open PGP keys. This is fairly usefull for people attending key signing parties.

I am sure this will be a great experience. Thanks Google and Gnome for this opportunity :-)